
Last Updated on June 19, 2026
Are you looking to create a custom Joomla module for your website? In this tutorial, you’ll learn how to develop a Joomla 5 and Joomla 6 module from scratch using modern Joomla development standards.
By the end of this guide, you’ll understand how to create a custom module, organise files correctly, add module parameters, retrieve data from the database, and display dynamic content on the frontend.
This tutorial is designed for beginners as well as Joomla developers who want to build custom extensions using the latest Joomla framework architecture.
What Is a Joomla Module?
A Joomla module is a lightweight extension used to display content or functionality in predefined template positions.
Examples of Joomla modules include:
- Login Form
- Latest Articles
- Popular Articles
- Custom HTML Content
- Search Module
- Image Sliders
- Menus
- Tags Module
Unlike components, which control the main content area, modules can appear in various locations such as sidebars, headers, footers, and custom template positions.
Joomla Module vs Component vs Plugin
| Extension Type | Purpose |
|---|---|
| Component | Controls the main content area of a page. |
| Module | Displays content in template positions. |
| Plugin | Executes code when Joomla events are triggered. |
Before learning module development, you may also want to read:
Requirements
Before creating your first Joomla module, make sure you have:
- Joomla 5.x or Joomla 6.x installed
- PHP 8.1 or higher
- Administrator access to Joomla
- Basic PHP knowledge
- A code editor such as VS Code or PhpStorm
Module We Will Build
In this tutorial, we will create a custom Joomla 6 module called mod_servicesgrid.
The module will:
- Display a responsive grid of services on the frontend
- Allow administrators to add and manage service items through the module settings
- Support service titles, descriptions, icons, images, and links
- Use Joomla 6 coding standards and PSR-4 autoloading
- Support language files for multilingual websites
- Use a Helper class for data processing and business logic
- Use layout files for clean separation of logic and presentation
- Support template overrides for easy customization
- Be fully installable as a standard Joomla extension
- Follow Joomla 6 extension development best practices
By the end of this tutorial, you will have a modern, reusable Services Grid module that can be easily customized and deployed on any Joomla 6 website.
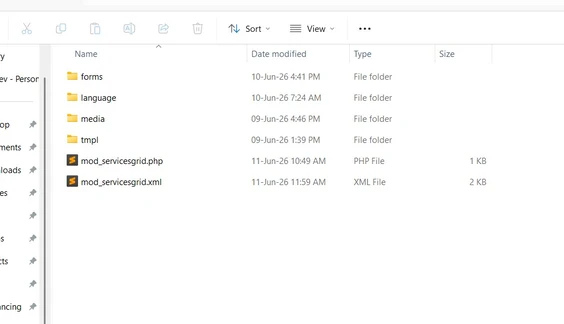
Step 1: Create the Module Folder Structure
Create a new folder named mod_latestposts.
Your module directory should look like this:
mod_servicesgrid/
│
├── mod_servicesgrid.php
├── mod_servicesgrid.xml
│
├── forms/
│ └── service.xml
│
├── tmpl/
│ └── default.php
│
├── media/
│ └── css/
│ └── style.css
│
└── language/
└── en-GB/
├── en-GB.mod_servicesgrid.ini
└── en-GB.mod_servicesgrid.sys.ini
Directory Explanation
| Directory/File | Purpose |
|---|---|
mod_servicesgrid.php | Main entry point of the module. Loads the helper, retrieves module data, and renders the layout. |
mod_servicesgrid.xml | An installation manifest file that defines module metadata, files, folders, and configuration parameters. |
tmpl | Contains frontend layout files used to render the services grid output. |
language | Stores language and translation files for multilingual support. |
media | Optional directory for module-specific CSS, JavaScript, images, and other frontend assets. |
forms | An optional directory for module-specific forms that allows administrators to enter and save data in the backend. |
Step 2: Create the XML Manifest File
Create a file named: mod_servicesgrid.xml
This file tells Joomla how to install and configure the module. It provides the following information about the module:
- Module name
- Version
- Author information
- Files to install
- Language files
- Module parameters
Without this file, Joomla cannot install the module.
Add the following code:
Note: I have added a comment block at the top of the file. While it is not technically required for functionality, it follows Joomla coding standards and is commonly expected for extensions submitted to the Joomla Extensions Directory (JED). The comment provides basic information about the extension, making the code easier to identify and maintain.
 <?xml version="1.0" encoding="utf-8" ?>
<!--
/**
 * @package     Joomla.Site
 * @subpackage  mod_servicesgrid
 *
 * @copyright   Copyright (C) 2026 Your Company. All rights reserved.
 * @license     GNU General Public License version 2 or later
 * @author      Sanjeev Raghuwanshi
 * @link        https://joomtechsolutions.com
 */
-->
<extension type="module" client="site" method="upgrade">
 <name>MOD_SERVICESGRID</name>
 <author>Sanjeev Kumar</author>
 <version>1.0.0</version>
 <description>MOD_SERVICESGRID_DESC</description>

 <files>
 <filename module="mod_servicesgrid">mod_servicesgrid.php</filename>
 <folder>tmpl</folder>
 <folder>forms</folder>
 <folder>media</folder>
 <folder>language</folder>
 </files>

 <languages>
 <language tag="en-GB">language/en-GB/en-GB.mod_servicesgrid.ini</language>
 <language tag="en-GB">language/en-GB/en-GB.mod_servicesgrid.sys.ini</language>
 </languages>

 <config>
    <fields name="params">
     <fieldset name="basic" label="MOD_SERVICESGRID_SERVICES">
       <field name="services" type="subform" multiple="true" formsource="service.xml" label="MOD_SERVICESGRID_SERVICES" />
    </fieldset>
 </fields>
 </config>
</extension>
What Does the Manifest File Do?
- Defines module metadata.
- Registers files and folders.
- Registers language files.
- Creates module parameters.
- Controls installation and updates.
In the next section, we’ll create the main module file (mod_servicesgrid.php) and build the helper class that retrieves articles from the Joomla database.
Step 3: Create the Main Module File
The main module file serves as the module’s entry point. Joomla executes this file whenever the module is rendered on the frontend.
file name is mod_servicesgrid.php, and add the following code:
<?php
defined("_JEXEC") or die;
use Joomla\CMS\Factory;
use Joomla\CMS\Helper\ModuleHelper;

$wa = Factory::getApplication()
    ->getDocument()
    ->getWebAssetManager();

$wa->registerAndUseStyle(
    'mod_servicesgrid',
    'modules/mod_servicesgrid/media/css/style.css'
);

$services = (array) $params->get('services');

require ModuleHelper::getLayoutPath(
    'mod_servicesgrid',
    $params->get("layout", 'default')
);Responsibilities:
- Prevent direct access.
- Retrieve module parameters.
- Load required assets.
- Load the layout file.
Example workflow:
- Joomla loads the module.
- Parameters are retrieved.The
- CSS file is loaded.
- The layout file is rendered.
This file should remain lightweight.
Step 4: Create the Service Subform
File:forms/service.xml
Instead of creating fixed service fields, we’ll use a Joomla Subform.
Benefits:
- Add unlimited services.
- No code changes required.
- Easy administration.
Each service can contain:
- Title
- Description
- Icon
- Link
The administrator can click “Add Service” to create additional service entries. This makes the module highly flexible.
Add the following code: you can see after the first line, there are added comments that are standard but not required.
<?xml version="1.0" encoding="utf-8"?>
<!--
/**
 * Service Subform Definition
 *
 * @package     Joomla.Site
 * @subpackage  mod_servicesgrid
 * @since       1.0.0
 */
-->
<form>


    <fields name="item">

        <field
            name="title"
            type="text"
            label="MOD_SERVICESGRID_TITLE"
            required="true"
        />

        <field
            name="image"
            type="media"
            label="MOD_SERVICESGRID_IMAGE"
        />

        <field
            name="description"
            type="textarea"
            label="MOD_SERVICESGRID_DESCRIPTION"
        />

        <field
            name="link"
            type="url"
            label="MOD_SERVICESGRID_LINK"
        />

    </fields>
</form>
Step 5: Add Module Parameters
Inside the manifest file, create a subform field.
Example configuration:
- Services Field
- Multiple = true
- Form source = service.xml
When the module settings are opened, Joomla automatically loads the subform and displays repeatable service fields.
The entered data is stored in the module parameters JSON.
Example: This code is already added in the main file mod_servicesgrid.xml.
<config>
  <fields name="params">
      <fieldset name="basic" label="MOD_SERVICESGRID_SERVICES">
         <field name="services" type="subform" multiple="true" formsource="service.xml" label="MOD_SERVICESGRID_SERVICES" />
      </fieldset>
  </fields>
</config>
Step 6: Create Language Files
Files:
- language/en-GB/en-GB.mod_servicesgrid.ini
- language/en-GB/en-GB.mod_servicesgrid.sys.ini
en-GB.mod_servicesgrid.ini
Contains: This file contains labels and descriptions for the front-end display as below-
- Field labels
- Descriptions
- Frontend text
Example:
MOD_SERVICESGRID="Services Grid"
MOD_SERVICESGRID_SERVICES="Services"
en-GB.mod_servicesgrid.sys.ini
Contains: This is also a language file which contains the labels and description of the module to display for the backend as below-
- Module name
- Module description
Example:
MOD_SERVICESGRID="Services Grid"
MOD_SERVICESGRID_XML_DESCRIPTION="Displays services in a responsive grid."
Using language files makes your extension multilingual and Joomla-standard compliant.
Step 7: Create the Frontend Layout
File: tmpl/default.php
This is the template file and controls the HTML output. It presents the result of backend options. Please have a look at the following code in this file:
<?php /** * @package Joomla.Site * @subpackage mod_servicesgrid * * Default template for Services Grid module. * * @since 1.0.0 */defined('_JEXEC') or die; use Joomla\CMS\Language\Text; ?> <div class="services-grid"> <div class="row g-4"> <?php foreach ($services as $service) : $item = $service->item; ?> <div class="col-lg-4 col-md-6"> <div class="card"> <?php if (!empty($item->image)) : ?> <img src="<?php echo htmlspecialchars($item->image); ?>" class="card-img-top" alt="<?php echo htmlspecialchars($item->title); ?>"> <?php endif; ?> <div class="card-body"> <h3 class="card-title"><?php echo htmlspecialchars($item->title); ?></h3> <p class="card-text"><?php echo htmlspecialchars($item->description); ?></p> <?php if (!empty($item->link)) : ?> <a href="<?php echo htmlspecialchars($item->link); ?>" class="btn btn-primary"> <?php echo Text::_('MOD_SERVICESGRID_READMORE'); ?> </a> <?php endif; ?> </div> </div> </div> <?php endforeach; ?> </div> </div>
Responsibilities:
- Read services data.
- Loop through service items.
- Generate grid markup.
- Display titles and descriptions.
Typical process:
- Read module parameters.
- Decode subform data.
- Loop through services.
- Display service cards.
This keeps presentation separate from business logic.
Step 8: Add CSS Styling
File: media/css/style.css
This file controls the appearance of the services grid.
/**
 * Services Grid Module Styles
 * @package     Joomla.Site
 * @subpackage  mod_servicesgrid
 * @since       1.0.0
 */
.services-grid .card{
    border: none;
    border-radius:12px;
    overflow: hidden;
    transition:.3s;
    box-shadow:0 5px 15px rgba(0,0,0,.1);
    height:100%;
}
.services-grid .card:hover{ transform:translateY(-6px); }
.services-grid img{ height:220px;  object-fit:cover; }
.services-grid .card-body{  padding:25px; }
.services-grid .card-title{ font-size:20px; margin-bottom:15px; }
.services-grid .btn{ border-radius:50px; }- Grid layout
- Card spacing
- Hover effects
- Typography
- Mobile responsiveness
Recommended design:
- 3 columns on desktop
- 2 columns on tablet
- 1 column on mobile
Keeping styles in a separate CSS file makes future customization easier.
Step 9: Load CSS Assets
Register the stylesheet from the module entry file using the following code in mod_servicesgrid.php file :
$wa = Factory::getApplication()
    ->getDocument()
    ->getWebAssetManager();


$wa->registerAndUseStyle(
    'mod_servicesgrid',
    'modules/mod_servicesgrid/media/css/style.css'
);Purpose:
- Ensure CSS loads only when the module is used.
- Improve maintainability.
- Follow Joomla 5/6 best practices.
The CSS file should be loaded using Joomla’s Web Asset Manager whenever possible.
Step 10: Package the Module
We are now ready to proceed to the final stage—installing and testing the module. Before installation, ensure that the following files are present in the package:
Required Files
- mod_servicesgrid.php
- mod_servicesgrid.xml
- forms/service.xml
- tmpl/default.php
- media/css/style.css
- language files
Create ZIP Package
The ZIP root must contain:
- mod_servicesgrid.xml
- mod_servicesgrid.php
- forms/
- tmpl/
- media/
- language/
Do not place everything inside an extra folder when creating the ZIP.
Step 11: Install the Module
To test the module, install it through the Joomla Administrator interface. Navigate to:
System → Extensions → Install
Then upload the module package (mod_servicesgrid.zip) and follow the installation process.
If installation succeeds:
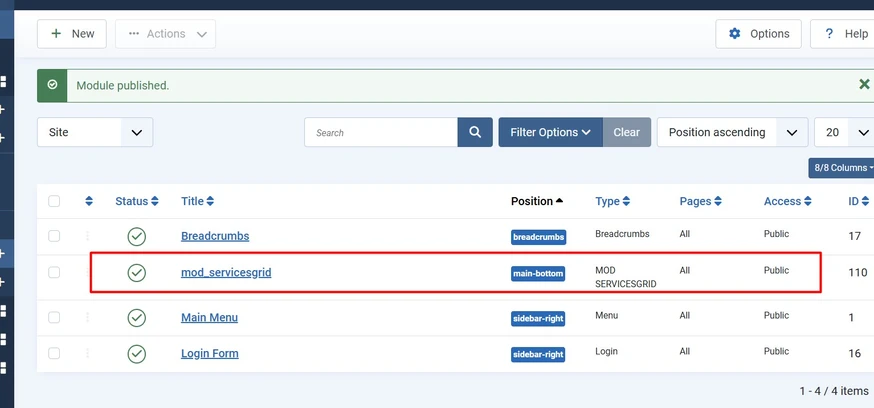
- Go to Content → Site Modules → mod_servicesgrid
- Assign Template position
- Publish the module.
Step 12: Add Services
Open the module from the Modules Manager. The Services subform field will be available in the module configuration, as illustrated in the screenshot below.
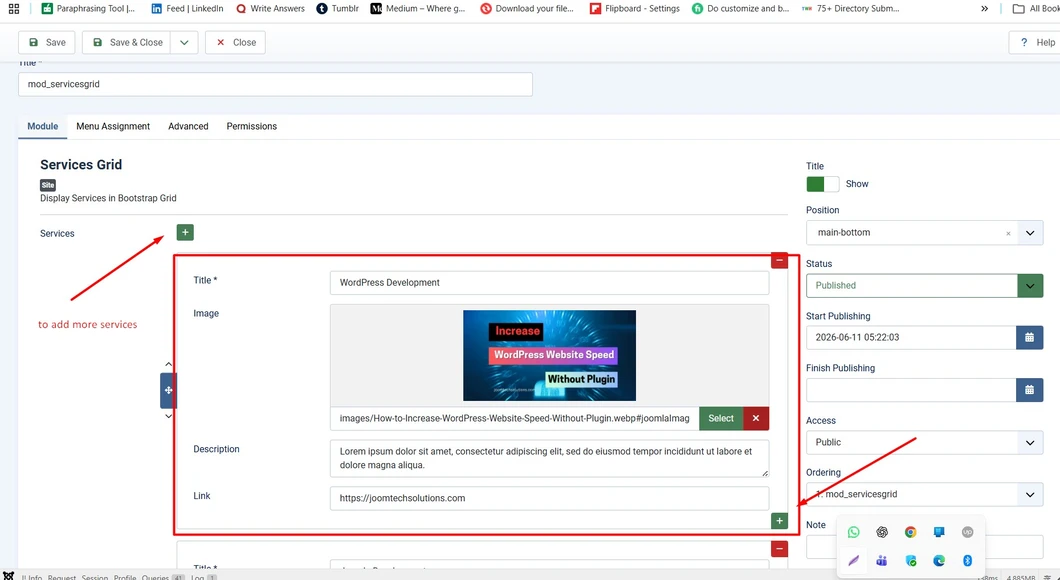
Click: Add Service
Fill in:
- Service Title
- Description
- Icon
- Link
Add as many services as needed.
Save the module.
Step 13: Test the Frontend
Visit the frontend.
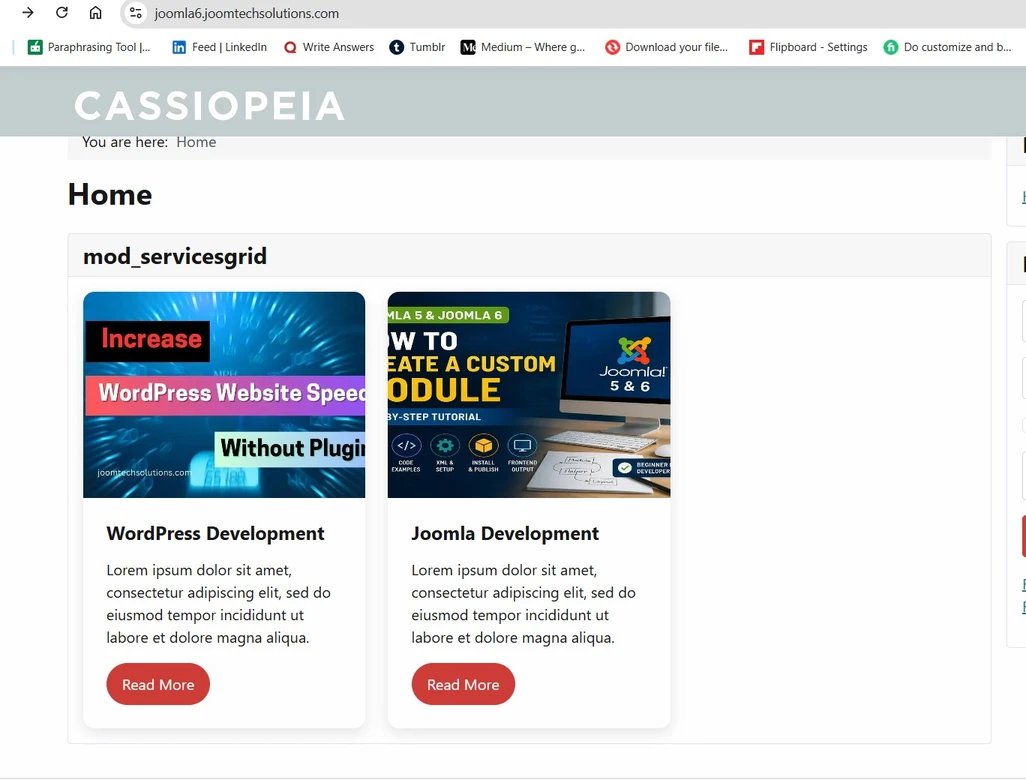
Verify:
- Services display correctly.
- Grid layout is responsive.
- Language strings load correctly.
- Styling is applied.
Also test on mobile devices.
Step 14: Troubleshooting Common Errors
1. Language File Missing
Cause:
- Incorrect language path.
- Missing language files.
Solution: Verify language folder structure.
2. Class “JText” Not Found
Cause: This is a Joomla 3 syntax of code, which is not compatible to joomla 5 or 6
Solution: Add the code below at the top of the file
use Joomla\CMS\Language\Text;3. Form::getInstance() Could Not Load File
Cause: Subform XML file missing.
Solution:
Verify: forms/service.xml exists and is included in the manifest.
4. Module Not Displaying
Cause:
- Module unpublished.
- Wrong position.
- Menu assignment issue.
Solution: Check module settings and template positions.
Conclusion
Congratulations! You have successfully built a Services Grid Module for Joomla 5/6
using modern Joomla development practices, including:
- A custom module architecture
- Joomla Subforms for repeatable service items
- Language files for multilingual support
- Responsive CSS for a mobile-friendly layout
- Joomla coding standards and best practices
This module provides a solid foundation for creating dynamic and reusable service listings within your Joomla website. As your requirements grow, you can further enhance it by adding features such as custom icons, images, animations, AJAX-powered functionality, advanced field types, or integration with other Joomla extensions. By following the techniques covered in this tutorial, you now have a scalable approach to developing professional, maintainable, and extensible Joomla modules for real-world projects.
Further Reading
If you’re new to Joomla extension development, you may also be interested in learning how to create custom components, plugins, and template overrides. These topics will help you build more advanced and flexible Joomla websites. Be sure to explore our other Joomla development tutorials for practical, real-world examples and best practices.
For additional reference, consult the Joomla Module Development Documentation, which provides detailed guidance on module development, coding standards, XML manifests, language files, and extension architecture. The official resources are an excellent companion to this tutorial and can help you stay aligned with the latest Joomla development practices.
Frequently Asked Questions (FAQ)
1. What is a Joomla Services Grid Module?
A Services Grid Module is a custom Joomla module that displays multiple services in a
structured grid layout. Each service can include a title, description, icon, image,
link, and other custom fields.
2. Is this module compatible with Joomla 5 and Joomla 6?
Yes. The module is built using modern Joomla development standards and is compatible
with Joomla 5. It is also designed to be forward-compatible with Joomla 6.
3. Why use a Subform in a Joomla module?
Subforms allow administrators to create and manage multiple repeatable items from a
single field. In this module, the Subform is used to add multiple services without
creating separate fields for each one.
4. Can I add icons or images to each service?
Yes. The module can be extended to support service icons, images, links, and other
custom fields by updating the Subform XML and template files.
5. How do I make the Services Grid responsive?
The module uses CSS Grid or Flexbox layouts to ensure that service items automatically
adapt to different screen sizes, providing a mobile-friendly experience.
6. Where are the service items stored?
Service data entered through the Subform field is stored in the module parameters and
managed through the Joomla Administrator interface.
7. Can I customize the module layout?
Absolutely. You can modify the module template, add template overrides, or create
alternative layouts to match your website’s design requirements.
8. Can I use multiple instances of the Services Grid Module?
Yes. Joomla allows you to create multiple instances of the same module, each with its
own configuration, services, and display settings.
9. Do I need coding knowledge to add services?
No. Once the module is installed, administrators can add, edit, and reorder services
directly from the Joomla backend without writing any code.
10. Can this module be extended for advanced projects?
Yes. The module serves as a solid foundation and can be enhanced with AJAX loading,
animations, custom field types, filtering options, category support, and integration
with other Joomla extensions.
Stay updated with our latest news, special offers, and exclusive updates directly in your inbox.