Last Updated on June 16, 2026
A template is one of the most important parts of any website because it controls the overall appearance, layout, and user experience of the front end. A well-designed template not only makes a website visually appealing but also helps improve navigation, engagement, and usability.
If you have a Joomla website and want to build a custom design that matches your brand or project requirements, learning how to create a Joomla template is an essential skill. In this step-by-step guide, you will learn the basics of Joomla template development and how to create your own custom Joomla template from scratch.
What Is a Joomla Template?
A Joomla template defines the visual presentation of your website. It controls how content, modules, menus, and other elements are displayed to visitors.
In simple terms, a Joomla template is a collection of files that work together to create the design and layout of a website. These files typically include HTML, CSS, JavaScript, images, and configuration files.
A well-designed template plays a vital role in attracting visitors, improving user experience, and encouraging users to spend more time on your website.
Like other content management systems (CMS) and web frameworks, Joomla uses templates to separate website design from content. This allows developers and site owners to change the appearance of a website without affecting its content.
By default, Joomla comes with several built-in templates for both the front end and the administrator area. These templates can be customized or used as a starting point for creating your own Joomla template.
Let’s See: How to Install Joomla QuickStart Package
Front-end –
1) Beez3
2) Protostar

Back-end
- Hathor
- isis
How to Create a Joomla Template
In this tutorial, you will learn how to create a custom Joomla template from scratch and install it on your Joomla website. Follow the steps below carefully.
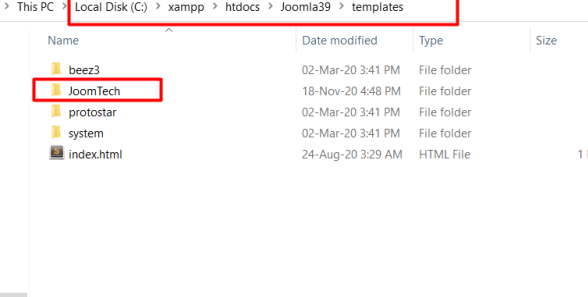
Step 1: Create the Template Folder
The first step is to create a new folder for your template. This folder will contain all the files required for your Joomla template.
For example, if your template name is JoomTech, create a folder named:
joomtech
You can create this folder in one of the following locations:
- Directly inside the /templates directory of your Joomla installation.
- On your local computer while developing the template.
If you choose to develop the template locally, you will need to compress the template folder into a ZIP file after completing the development process. You can then install it through the Joomla Administrator by navigating to:
Extensions→ Install →Browse
Once installed, Joomla will recognize the template and make it available for use on your website.
Example template directory:
/templates/joomtech/
In the next step, we will create the essential files required by Joomla to recognize and install the template properly.
Now, create 2 more folders inside your template JoomlaTech folder named images and CSS, to save all images and CSS files.

Step 2 –Inside the JoomTech folder, create a file called templateDetail.xml. This is the most important file of the template; if it is not included in the folder, the template will not work. With the help of this templateDetail.xml file, we can define module positions. Also, we can define which files and folders will be installed in the template.
<?xml version = "1.0" encoding = "utf-8"?>
<extension version = "3.0" type = "template">
<name>JoomTech SOlutions</name>
<creationDate>2020-12-18</creationDate>
<author>JoomTech Solutions</author>
<authorEmail>contact@joomtechsolutions.com</authorEmail>
<authorUrl>https://joomtechsolutions.com </authorUrl>
<copyright>@ JoomTech Solutions. All rights reserved</copyright>
<license>GNU/GPL</license>
<version>1.0.0</version>
<description>My First Template</description>
<files>
   <filename>index.php</filename>
   <filename>templateDetails.xml</filename>
   <folder>images</folder>
   <folder>css</folder>
 </files>
<positions>
  <position>breadcrumb</position>
  <position>left</position>
  <position>right</position>
  <position>top</position>
  <position>user1</position>
  <position>user2</position>
  <position>user3</position>
  <position>user4</position>
  <position>footer</position>
</positions>
</extension>
Details of the code
<extension version = “3.0” type = “template”> – This tag provides the information about the Joomla version and type of extension, so there is mentioned type=”template” because our extension is a Joomla template.
In Joomla, every extension contains an XML file, and where we have to mention the type of extension.
Here, some tags already show means of use like
<name> = name of the template.
<createDate> = Create the date of the template.
<author> = Author name of the template.
<authorUrl> = display the author's website URL.
<copyright> = Display copyright.
<license> = Display lisence version
<version> = Display the version of template.
<files> = This is the block tag that contains the filename and folder tags.
<folder> = Create the folder in the template.
<positions> = This is the block of positions where positions will be defined.
<position> = name of the position.
<?php
defined('_JEXEC') or die('Restricted access');
?>
<!DOCTYPE html>
<html xmlns="http://www.w3.org/1999/xhtml"
xml:lang="<?php echo $this->language; ?>"
lang="<?php echo $this->language; ?>">
<head>
<!-- Head Section -->
<jdoc:include type="head" />
<link rel="stylesheet"
href="<?php echo $this->baseurl; ?>/templates/system/css/system.css"
type="text/css" />
<link rel="stylesheet"
href="<?php echo $this->baseurl; ?>/templates/system/css/general.css"
type="text/css" />
<link rel="stylesheet"
href="<?php echo $this->baseurl; ?>/templates/<?php echo $this->template; ?>/css/template.css"
type="text/css" />
</head>
<body>
<!-- Body Section -->
<jdoc:include type="modules" name="top" />
<jdoc:include type="component" />
<jdoc:include type="modules" name="bottom" />
</body>
</html>About the code
<?php
defined( '_JEXEC' ) or die( 'Restricted access' );
?>
<!DOCTYPE html>
<html xmlns = "http://www.w3.org/1999/xhtml" xml:lang = "<?php echo $this->language; ?>" lang = "<?php echo $this->language; ?>" >
This code informs the browser which type of HTML page is being used and starts the HTML document by specifying the language used on the website.
<head>
<!-- Head Section -->

<jdoc:include type="head" />

<link rel="stylesheet"
href="<?php echo $this->baseurl; ?>/templates/system/css/system.css"
type="text/css" />

<link rel="stylesheet"
href="<?php echo $this->baseurl; ?>/templates/system/css/general.css"
type="text/css" />

<link rel="stylesheet"
href="<?php echo $this->baseurl; ?>/templates/<?php echo $this->template; ?>/css/template.css"
type="text/css" />
</head>
The above code is for the header tag and contains the head block of code. and 3 lines for tag lines are used to link the multiple stylesheets for the template in Joomla. It is for the header tag and contains the head block of code. and 3 lines for tag lines are used to link the multiple stylesheets for the template in Joomla.
<body>
<!-- Body Section -->

<!-- Top Module Position -->
<jdoc:include type="modules" name="top" />

<!-- Main Component Output -->
<jdoc:include type="component" />

<!-- Bottom Module Position -->
<jdoc:include type="modules" name="bottom" />
</body>
The above code is for the body section, where jdoc is used to include the output in Joomla from the positions of the Joomla system. The name = “top” is the module position of Joomla that will display at the top position, which can be assigned to any module-like menu. and name=”bottom” is another position that will be assigned to any module that will be displayed in the bottom area.
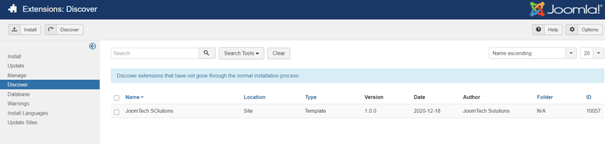
Step 4 − After creating these two files, log in to the Joomla administrator and click on Extension → Manager -> Discover, and the following page will be displayed.

Let See: Free Joomla Templates (2026): 10 Best Free Templates
Step 5: In the Joomla Administrator, click the Discover menu option. The Discover page will open and display any extensions or templates that are present on the server but have not yet been installed.
Next, click the Discover button to scan for the newly created template. Once Joomla detects the template, it will appear in the list as shown in the screenshot below.
Step 6 − Click on the checkbox to select the template and click on the Install button to install the template in Joomla.
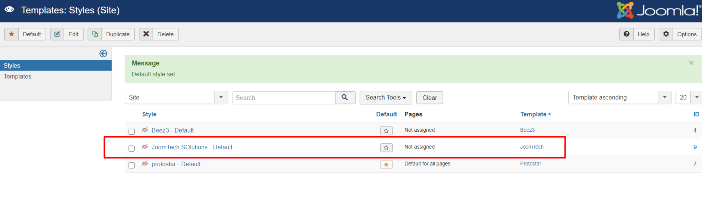
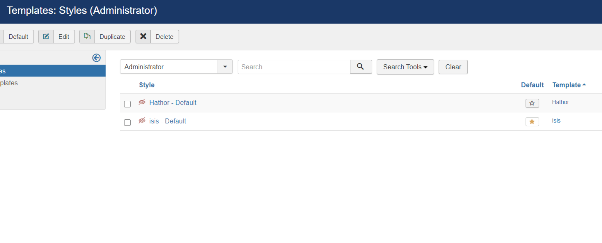
Step 8 − After installing the template, you can view your newly created template by clicking on Extension → Template Manager.
You will see your newly created template is listed as shown below.
Frequently Asked Questions (FAQs)
1. What is a Joomla 3 template?
A Joomla 3 template is a collection of files that controls the appearance and layout of a Joomla website. It typically includes PHP, HTML, CSS, JavaScript, images, and an XML manifest file.
2. What files are required to create a Joomla 3 template?
At a minimum, a Joomla 3 template requires an index.php file and a templateDetails.xml file. Most templates also include CSS files, JavaScript files, images, and module positions.
3. Where should I place my custom Joomla template?
Your custom template folder should be placed inside the /templates directory of your Joomla installation.
4. How do I install a custom template in Joomla 3?
Compress the template folder into a ZIP file and upload it through the Joomla Administrator by navigating to Extensions → Manage → Install.
5. What is templateDetails.xml in Joomla 3?
The templateDetails.xml file is the template manifest file. It contains information about the template, including its name, version, author, files, and module positions.
6. What are module positions in Joomla 3?
Module positions are predefined areas within a template where Joomla modules can be displayed, such as top, sidebar, footer, or bottom.
7. Can I create a Joomla 3 template without coding?
Basic customization can be done using template frameworks, but creating a custom Joomla 3 template from scratch requires knowledge of HTML, CSS, PHP, and Joomla template structure.
8. What is the purpose of the <jdoc:include> tag?
The The <jdoc:include> tag allows Joomla to dynamically display content, modules, metadata, and component output within a template.
Stay updated with our latest news, special offers, and exclusive updates directly in your inbox.