Last Updated on August 1, 2024
Featured images are essential for attracting visitors to your WordPress website. They serve as visual representations of your content and greatly influence the user experience. However, sometimes the default size of the featured image doesn’t fit your website’s design. In this post, we’ll show you how to easily change the size of WordPress-featured images to make them fit perfectly.
WordPress Featured Image
The WordPress featured image, also known as the post thumbnail, is an important picture that represents the main content of a WordPress post or page. It is different from other images in the post because it is chosen to be displayed prominently, usually at the top. Its main job is to catch people’s attention and show them a visual preview of the content.
The featured image stands out because it has a specific role as the primary image. It becomes especially important when the post or page appears in a blog feed, search results, or is shared on social media. By using its visual appeal, the featured image grabs people’s attention and gives them an exciting glimpse of what the content is about.
How to Change WordPress Featured Image Size: Steps
Step 1: Decide on the Desired Size Before you start, think about the size you want for your featured images. Consider your website’s layout and any specific requirements you have. Do you want larger images to stand out, or smaller ones to fit a specific section?
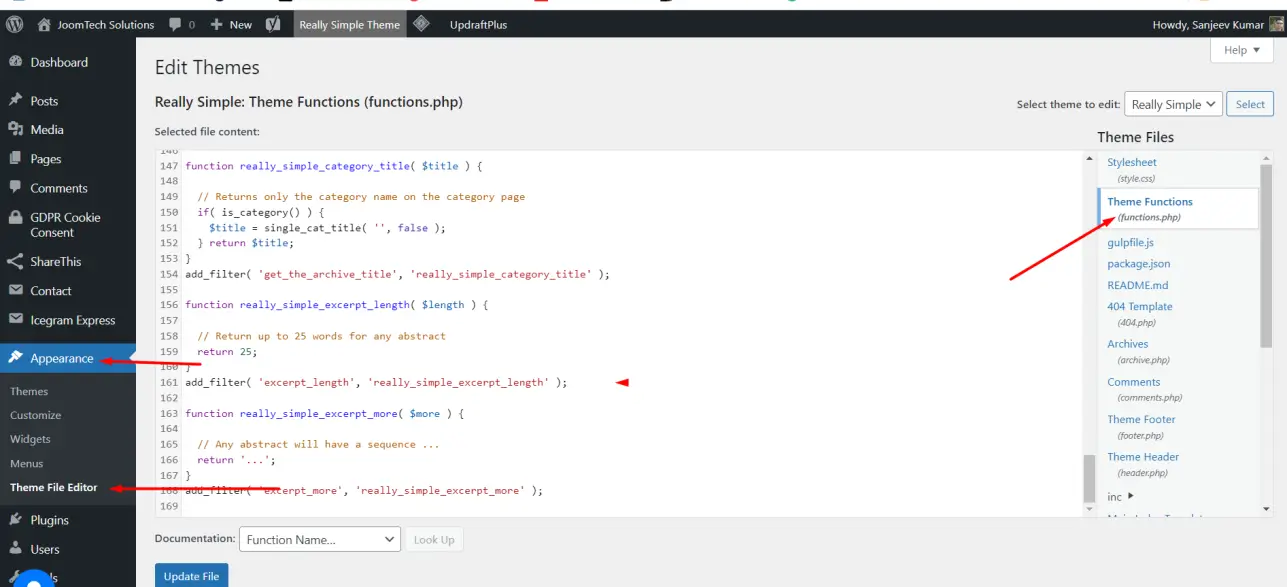
Step 2: Access the functions.php File To change the size of featured images, you’ll need to edit the functions.php file in your WordPress theme. Go to your WordPress dashboard and click on “Appearance” and then “Theme Editor.” Look for the “functions.php” file in the list on the right and click on it.
Learn How to Hide featured images on Post in WordPress
Step 3: Open the functions.php File Once you’re in the theme editor, scroll down until you find the closing PHP tag (?>) at the bottom of the code.
Step 4: Add Code to Modify the Image Size To change the size of featured images, you’ll need to add a code snippet to the functions.php file.
Methods for WordPress Featured Image Size:
There are two methods you can use:
Option 1: Using the set_post_thumbnail_size() Function: Copy and paste the following code just above the closing PHP tag in the functions.php file:
set_post_thumbnail_size(width, height, crop);
Replace “width” and “height” with your desired dimensions for the featured image. If you want the image to be cropped to fit exactly, set the “crop” parameter to true. If you prefer to resize the image without cropping, set it to false.
Option 2: Using the add_image_size() function: Copy and paste the following code just above the closing PHP tag in the functions.php file:
add_image_size('custom-size', width, height, crop);
Replace “custom-size” with a unique name for your image size. Specify the desired width and height, and set the “crop” parameter according to your preference.
Step 5: Save the Changes After adding the code snippet, click the “Update File” button at the bottom right of the Theme Editor to save your changes to the functions.php file.
Step 6: Regenerate Thumbnails (If Needed) If you already have featured images on your WordPress posts, changing the size won’t automatically resize them. To update the existing images, you can use a plugin like “Regenerate Thumbnails” or “Force Regenerate Thumbnails.” Install and activate the plugin, then follow the provided instructions to regenerate the thumbnails for your featured images.
Conclusion: By following these simple steps, you can easily change the size of featured images in WordPress to fit your website’s design. Remember to consider the dimensions carefully and their impact on page load times and the user experience. Customizing the featured image size will enhance the visual appeal of your WordPress website, making a lasting impression on your visitors.
Learn How to add a Table of Content in WordPress
Stay updated with our latest news, special offers, and exclusive updates directly in your inbox.