Last Updated on August 19, 2026
Managing users is one of the most important tasks for any Joomla website administrator. Whether you are creating an account for an editor, author, manager, customer, or team member, Joomla 6 provides a flexible and secure user management system.
In this tutorial, you will learn how to create users in Joomla 6, assign them to the correct user groups, configure account settings, and avoid common mistakes. This guide is suitable for beginners as well as experienced Joomla administrators.
By the end of this article, you will be able to create and manage users on your Joomla 6 website confidently.
Joomla 6 includes a powerful user management system that allows you to create accounts, assign user groups, and control permissions with ease. For a complete overview of Joomla’s core features and official documentation, visit the Joomla Documentation.
Why Create Users in Joomla 6?
Instead of sharing a single administrator account, Joomla allows every person to have their own login credentials. This improves website security and makes it easier to track who created or edited content.
You can create users for many purposes, including:
- Website Administrators
- Content Authors
- Editors and Publishers
- Registered Members
- Customers
- Support Staff
- Managers
Each user can have different permissions depending on the assigned user group.
How to Create Users in Joomla 6
Follow these simple steps to add a new user to your Joomla 6 website.
Step 1: Login to Joomla Administrator
Open your Joomla administrator panel by visiting:
https://yourdomain.com/administrator
Log in using your Super User account.
Step 2: Open User Manager
From the Administrator Dashboard:
- Click Users.
- Select Manage.
- You will see the list of existing users.
- Click the New button.
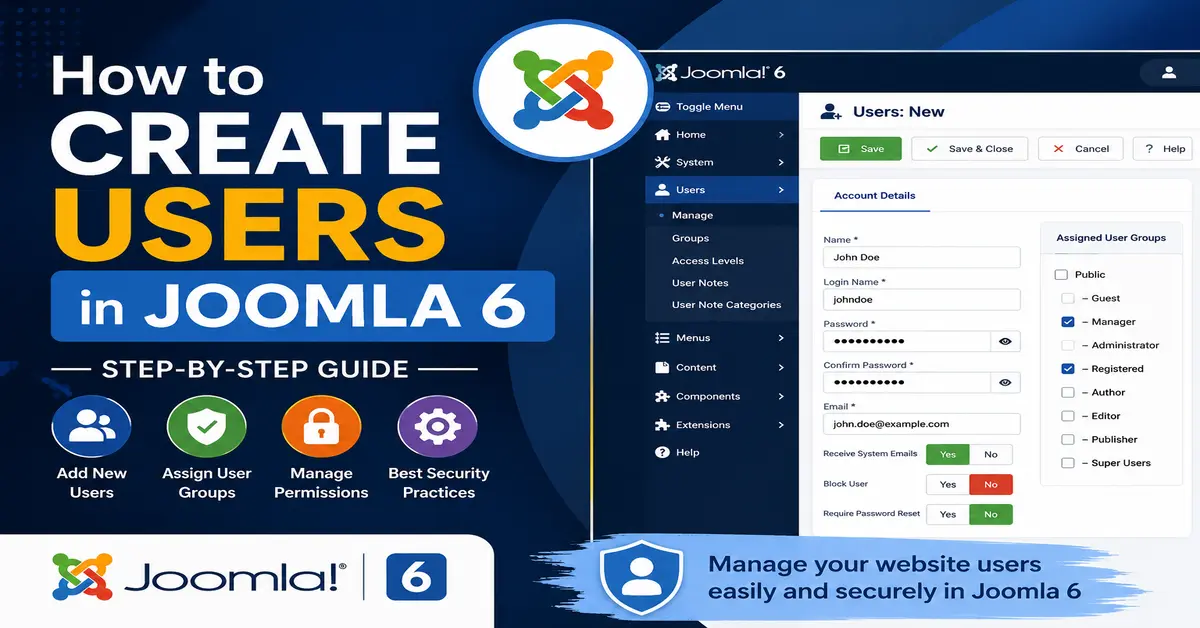
The New User form will open.
Step 3: Enter User Details
Now fill in the required information.
| Field | Description |
|---|---|
| Name | The user’s full name. |
| Login Name | Unique username used for login. |
| Password | Create a strong password. |
| Confirm Password | Re-enter the password. |
| User’s valid email address. | |
| User Groups | Select one or more groups. |
| Receive System Emails | Enable only for administrators if needed. |
| Block User | Choose No unless you want to disable the account. |
| Require Password Reset | Optional for better security. |
Make sure every user has a unique email address and username.
Step 4: Select the Appropriate User Group
Choosing the correct user group is very important because it controls what the user can access on your website.
Common Joomla user groups include:
- Registered – Can log in to the front-end.
- Author – Can create articles.
- Editor – Can edit articles.
- Publisher – Can publish articles.
- Manager – Limited administrator access.
- Administrator – Can manage most backend functions.
- Super Users – Full website control.
Always assign the minimum permissions required. This follows the principle of least privilege and improves website security.
Choosing the correct user group is only one part of managing website permissions. To understand how permissions work in detail, read our Joomla Access Control List (ACL) guide. It explains how User Groups, Access Levels, and Permissions work together to give users the right level of access.
Step 5: Save the User
After entering all information:
- Click Save.
- The new user will appear in the User Manager.
The user can now log in using the provided username and password.
Understanding Joomla User Groups
Many beginners confuse users with user groups.
A User is an individual account.
A User Group determines what that account can do.
For example:
- John can belong to the Editor group.
- Sarah can belong to the Administrator group.
- Mike can belong to the Registered group.
Even if all three users exist on the same website, each has different permissions.
To learn more about Joomla’s permission system and recommended access control practices, refer to the official Joomla Access Control (ACL) Documentation. It provides detailed explanations of user groups, access levels, and permissions.
If you’re new to Joomla administration, you should also learn the difference between User Groups and Access Levels. Our detailed guide on Joomla User Groups vs Access Levels explains these concepts with practical examples to help you configure user permissions correctly.
How to Edit an Existing User
If you need to update a user’s information:
- Go to Users → Manage.
- Click the user’s name.
- Modify the required information.
- Click Save.
You can change passwords, email addresses, user groups, language preferences, and other account settings.
How to Block a User
If you want to temporarily disable an account without deleting it:
- Open the user profile.
- Set Block User to Yes.
- Save the changes.
The user will no longer be able to log in until the account is unblocked.
How to Delete a User
To permanently remove a user:
- Navigate to Users → Manage.
- Select the user.
- Click Delete.
- Confirm the deletion.
Be careful when deleting administrator accounts, especially Super Users.
Best Practices for User Management
- Use strong passwords.
- Assign only the required permissions.
- Never share administrator accounts.
- Remove inactive users regularly.
- Enable Two-Factor Authentication when possible.
- Review user permissions periodically.
- Use unique email addresses.
- Monitor administrator accounts.
For enhanced website security, consider enabling Two-Factor Authentication for administrator accounts. Follow our step-by-step Joomla Tutorials to learn more about securing your Joomla 6 website and protecting user accounts from unauthorized access.
Common Mistakes to Avoid
- Giving every user Super User access.
- Using weak passwords.
- Sharing one administrator account among multiple people.
- Forgetting to remove former employees.
- Assigning incorrect user groups.
- Ignoring password reset requests.
Conclusion
Creating users in Joomla 6 is a straightforward process, but assigning the correct user group is just as important as creating the account itself. By following the steps in this guide, you can securely manage website users, protect sensitive data, and maintain an organized Joomla website.
Whether you manage a personal blog, business website, membership portal, or online community, Joomla’s powerful user management system gives you complete control over who can access and manage your website.
Keeping your Joomla website updated is essential for security and performance. You can download the latest stable version and stay informed about new releases from the official Joomla website.
Frequently Asked Questions
How do I create a new user in Joomla 6?
Go to Users → Manage → New, enter the user’s information, assign a user group, and click Save.
Which user group should I choose?
Select the user group based on the permissions the user needs. Avoid assigning Super User access unless absolutely necessary.
Can one user belong to multiple user groups?
Yes. Joomla allows users to belong to multiple user groups simultaneously.
Can I change a user’s permissions later?
Yes. Simply edit the user and update their assigned user groups whenever needed.
Is it better to block or delete a user?
If the user may need access again in the future, blocking the account is usually the better option. Delete users only when you no longer need their accounts.
Stay updated with our latest news, special offers, and exclusive updates directly in your inbox.