Last Updated on July 6, 2026
Modules are one of the most powerful features in Joomla 5. They allow you to display different types of content anywhere on your website, including the sidebar, header, footer, or any template position supported by your Joomla template.
If you’re new to Joomla or want to learn how to create modules without writing code, this guide will walk you through the complete process.
In this tutorial, you’ll learn how to create a new module from the Joomla 5 administrator panel, configure its settings, assign it to menu items, choose a template position, and publish it on your website. If you’re new to Joomla, visit the Joomla Official Website to learn more about the CMS.
Note: The steps in this article also work for Joomla 6 with only minor interface differences.
What Is a Module in Joomla 5?
A module is a lightweight content block that displays specific information on your website. Unlike Joomla articles, modules are designed to appear in predefined template positions and can be assigned to selected pages or the entire website.
Some of the most commonly used Joomla modules include:
- Custom Module
- Menu Module
- Login Form
- Latest Articles
- Latest Users
- Breadcrumbs
- Search
- Who’s Online
- Tags
- Random Image
Joomla comes with many built-in modules, and you can also install third-party modules to extend your website’s functionality. You can extend Joomla’s built-in functionality using extensions available in the Joomla Extensions Directory (JED).
How to Create a New Module in Joomla 5 from the Backend
Log in to your Joomla 5 Administrator Dashboard using your administrator credentials.
From the left navigation menu, go to:
Content → Site Modules
This opens the Site Modules Manager, where you can manage existing modules or create a new one.
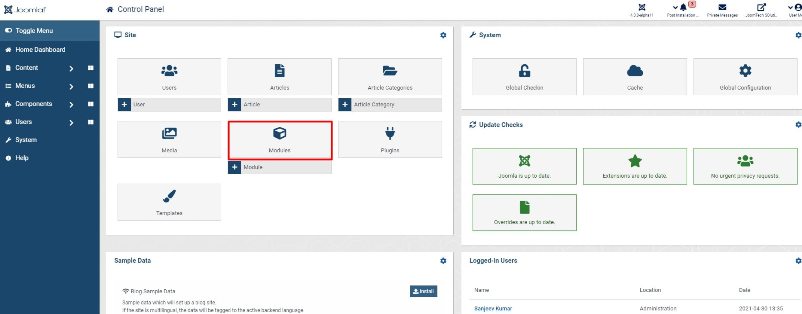
The Site Modules Manager displays every module currently available on your website. From here, you can:
- Create a new module.
- Edit existing modules.
- Publish or unpublish modules.
- Duplicate modules.
- Assign modules to menu items.
- Control where modules appear on your website.
To create a new module, click the New button located in the toolbar.
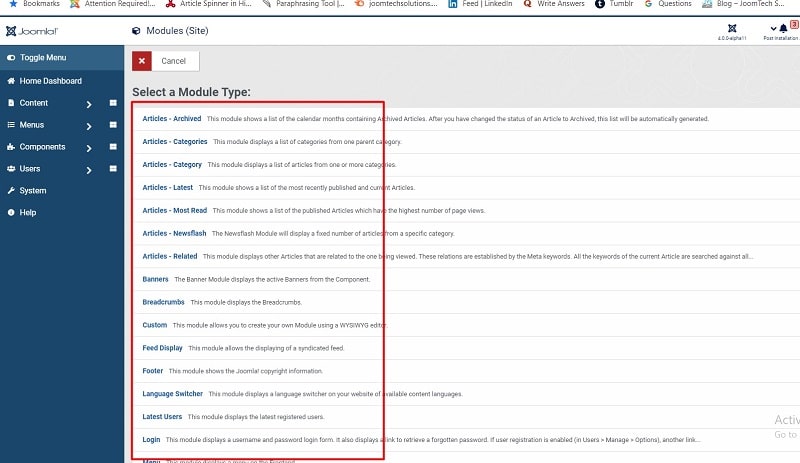
Joomla will display a list of all available module types.
Related Tutorial: How to Install a Joomla Template on Localhost

Select the Module Type
After clicking New, Joomla displays all built-in module types available for your website.
Each module serves a different purpose. For example:
- Custom Module – Display custom HTML, images, videos, or text.
- Menu Module – Display one or more Joomla menus.
- Latest Articles – Show recently published articles.
- Latest Users – Display the newest registered users.
- Search Module – Add a search box to your website.
- Breadcrumbs – Improve navigation for visitors.
- Who’s Online – Display the number of visitors currently online.
Select the module that best fits your website requirements.
In the next section, we’ll create a Latest Users module and explain every available option in detail.
Create a Latest Users Module in Joomla 5
For this example, we’ll create a Latest Users module. This built-in Joomla module displays a list of the most recently registered users on your website. It is useful for membership sites, community portals, intranets, and websites where you want to showcase new registrations.
From the list of available module types, click Latest Users. Joomla will open the module configuration screen where you can customize its settings before publishing it.
Configure the Latest Users Module
After selecting the module type, Joomla displays several configuration options. These settings determine how and where the module will appear on your website.
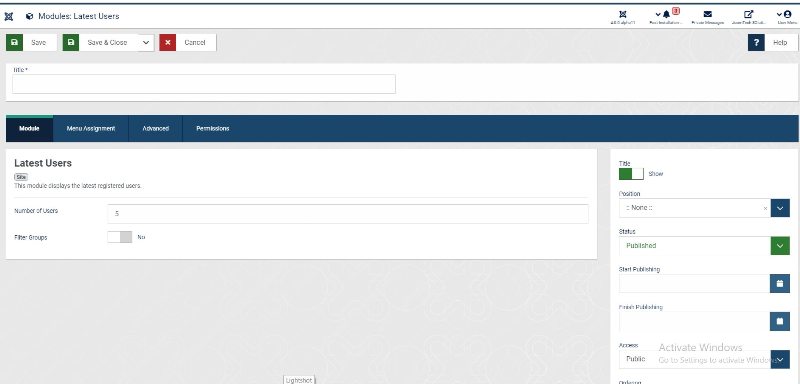
1. Module Title
Enter a descriptive title for the module. This title helps you identify the module in the Joomla administrator area.
Example:
- Latest Users
- Newest Members
- Recently Registered Users
2. Number of Users
Select how many recently registered users you want to display on the frontend. Displaying between 5 and 10 users is usually sufficient for most websites.
3. Filter Groups
The Filter Groups option allows you to display users from specific Joomla user groups only.
For example, you can choose to display:
- Registered Users
- Authors
- Editors
- Publishers
- Custom User Groups
If you don’t need any filtering, simply leave this option disabled.
4. Show Title
Choose whether the module title should be displayed on the frontend.
- Show – Displays the module title.
- Hide – Hides the module title while keeping the module content visible.
5. Module Position
Select the template position where the module should appear.
Common Joomla template positions include:
- sidebar-right
- sidebar-left
- top
- bottom
- banner
- footer
- menu
- debug
Tip: The available module positions depend on the Joomla template currently installed on your website.
6. Module Status
The Status setting determines whether the module is visible on your website.
- Published – The module is displayed on the frontend.
- Unpublished – The module is saved but hidden.
- Trashed – Moves the module to the Trash.
- Archived – Stores the module without displaying it.
Normally, you’ll choose Published after completing the configuration.
7. Access Level
The Access setting controls which visitors can view the module.
Common access levels include:
- Public
- Guest
- Registered
- Special
- Custom Access Levels
For example, if you want only logged-in users to see the module, select Registered.
8. Language
If your website is multilingual, you can assign the module to a specific language. Otherwise, leave the setting as All so the module appears regardless of the selected language.
9. Start Publishing
You can schedule when the module becomes visible by selecting a future date and time.
This feature is useful for:
- Marketing campaigns
- Holiday promotions
- Special announcements
- Seasonal content
10. Finish Publishing
Similarly, Joomla allows you to automatically unpublish the module after a specified date.
This eliminates the need to manually remove temporary content once a campaign or event has ended.
Menu Assignment
The Menu Assignment tab determines where the module appears on your website. This is one of the most important settings because it controls the visibility of the module across different pages.
Joomla provides four menu assignment options:
- On All Pages
Displays the module on every page of your website. - No Pages
The module is not displayed anywhere until you assign it to menu items. - Only on the Pages Selected
Choose this option if you want the module to appear only on specific menu items. - On All Pages Except Those Selected
Displays the module throughout the website except on the selected menu items.
Using menu assignments helps keep your website organized and improves the user experience by displaying relevant content only where it’s needed.
Related Tutorial: How to Install the Joomla Quickstart Package
Advanced Module Settings in Joomla 5
After configuring the basic settings, click the Advanced tab. These options allow you to customize the appearance, layout, and performance of your module without modifying Joomla core files.
Depending on the selected module type and your active template, you may see some or all of the following options.
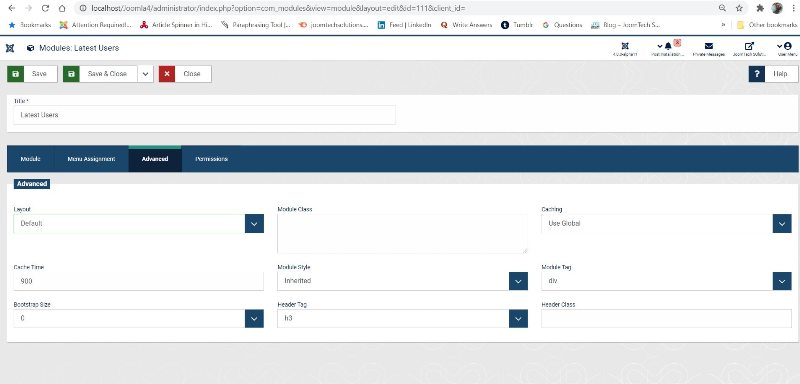
Alternative Layout
The Alternative Layout option lets you use a custom layout for the module instead of the default one. This is especially useful when you’ve created template overrides and want to display the module with a different design.
Module Class Suffix
The Module Class Suffix field allows you to add a custom CSS class to the module. This is one of the best ways to style individual modules without affecting others.
For example, you can add a class such as featured-module and then apply your own CSS styles in the template stylesheet.
Module Style
Some Joomla templates provide multiple module styles, such as cards, outlines, shadows, or custom layouts. If your template supports them, you can choose a style that matches your website’s design.
Header Tag
Select the HTML heading tag for the module title, such as <h2>, <h3>, or <h4>. Using proper heading tags improves accessibility and helps search engines understand your page structure.
Module Tag
The Module Tag option specifies the HTML element that wraps the module, such as <div>, <section>, or <aside>. Choosing semantic HTML elements can improve your website’s structure and accessibility.
Header Class
Add a custom CSS class to the module heading if you want to style the title separately from the module content.
Caching
Joomla 5 includes built-in caching options that can improve website performance by reducing page generation time.
The available caching settings are:
- Use Global – Uses the caching configuration defined in Joomla Global Configuration.
- No Caching – Disables caching for this module.
- Use Module Cache – Enables caching specifically for this module.
Cache Time
If module caching is enabled, you can specify how long Joomla should keep the cached version before generating fresh content.
For dynamic modules that update frequently, use a shorter cache time. For static modules, a longer cache time can improve performance.
Permissions
The Permissions tab allows administrators to control who can manage, edit, delete, or configure the module.
By default, Joomla inherits permissions from the parent component, which is sufficient for most websites. However, if multiple administrators or content managers work on your website, you can customize these permissions for individual user groups.
Available permission settings include:
- Edit
- Edit State
- Delete
- Edit Own
- Configure
- Access Administration Interface
Unless you have specific access control requirements, it’s generally recommended to leave these settings unchanged.
Related Tutorial: How to Enable Joomla PHP Error Reporting
Best Practices for Creating Joomla 5 Modules
Follow these best practices to keep your Joomla website organized and easy to manage:
- Use clear and descriptive module titles.
- Publish modules only where they are needed.
- Assign modules to specific menu items whenever possible.
- Use Module Class Suffix instead of modifying Joomla core files.
- Enable caching for static modules to improve website performance.
- Organize modules by position and purpose for easier administration.
- Test the module on both desktop and mobile devices before publishing.
Conclusion
Creating a new module in Joomla 5 is a simple process that requires no programming knowledge. From the Administrator Dashboard, navigate to Content → Site Modules, click New, choose the desired module type, configure its settings, assign a template position, and publish it.
Joomla’s flexible module system makes it easy to display menus, articles, login forms, custom HTML, user information, and many other types of content exactly where you want them. By using menu assignments, access levels, caching, and advanced styling options, you can build a well-structured and high-performing Joomla website. For additional tutorials and technical information, refer to the official Joomla Documentation.
Frequently Asked Questions
What is a module in Joomla 5?
A module is a reusable content block that displays information in predefined template positions, such as the sidebar, header, footer, or other areas of a Joomla website.
How do I create a new module in Joomla 5?
Go to Content → Site Modules, click New, select a module type, configure the settings, assign a module position, and publish it.
Can I display a Joomla module on selected pages only?
Yes. Use the Menu Assignment option to display the module on selected menu items, all pages, or everywhere except selected pages.
What is the Module Class Suffix in Joomla?
The Module Class Suffix lets you add a custom CSS class to an individual module so you can apply unique styling without changing Joomla core files.
Is the module creation process the same in Joomla 6?
Yes. Joomla 6 follows almost the same workflow as Joomla 5, so the steps in this tutorial are also applicable with only minor interface differences.
Stay updated with our latest news, special offers, and exclusive updates directly in your inbox.