Last Updated on April 28, 2026
If you’re planning to build a website with Joomla, the best way to start is by setting it up on your local computer. In this step-by-step guide, you will learn how to install Joomla 5 on Windows 11 using XAMPP quickly and easily.
This method allows you to create and test your website offline without needing a live server, making it perfect for beginners and developers alike. By the end of this tutorial, you’ll have a fully working Joomla installation ready for development. You can also check our related guide on installing XAMPP on Windows 11 for setting up your local server environment.
What You Need Before Installing Joomla
Before you install Joomla, it’s important to make sure your system is properly set up with the required tools and environment. Joomla runs on PHP and uses a database like MySQL, so you need a local or live server that supports these technologies.
On a local machine, software like XAMPP helps you create this environment easily. You may also explore: How to Install Joomla Template on Localhost Using XAMPP
You will also need the latest Joomla installation package. If you want a complete pre-built site with demo content, check: How to Install Joomla QuickStart Package.
System Requirements
- Operating System: Windows 11, macOS, or Linux
- Local Server: XAMPP / WAMP / LAMP
- PHP and MySQL support
- Latest Joomla 5 package
Step-by-Step Guide to Install Joomla 5 on Localhost
Now that your system is prepared, you can proceed with installing Joomla 5 on your localhost using XAMPP. The process is straightforward and involves setting up a local server, creating a database, and running the Joomla installation wizard. By following the steps below carefully, you will have a fully functional Joomla website running on your local machine, ready for development and testing.
Step 1: Install XAMPP on Windows 11
To get started, you need to setup a local server environment on your Windows 11 system. XAMPP is a popular and easy-to-use solution that provides all the required components, such as Apache, MySQL, and PHP, for running Joomla locally.
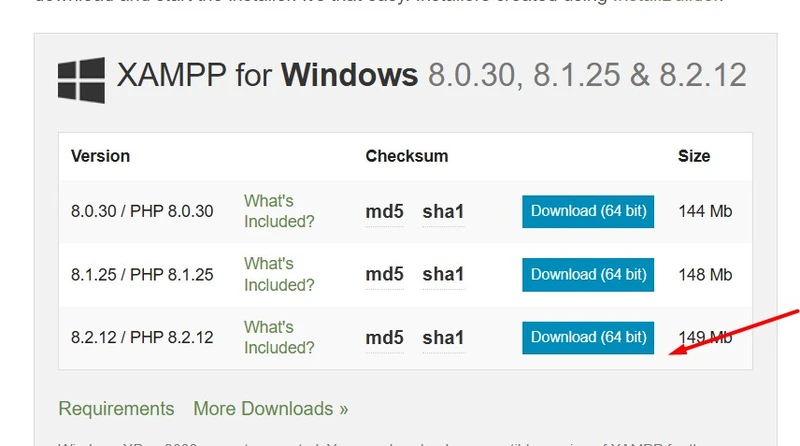
Download the latest version of XAMPP from the official website: Download XAMPP
Once the installation is complete, open the XAMPP Control Panel and start the following services:
- Apache
- MySQL
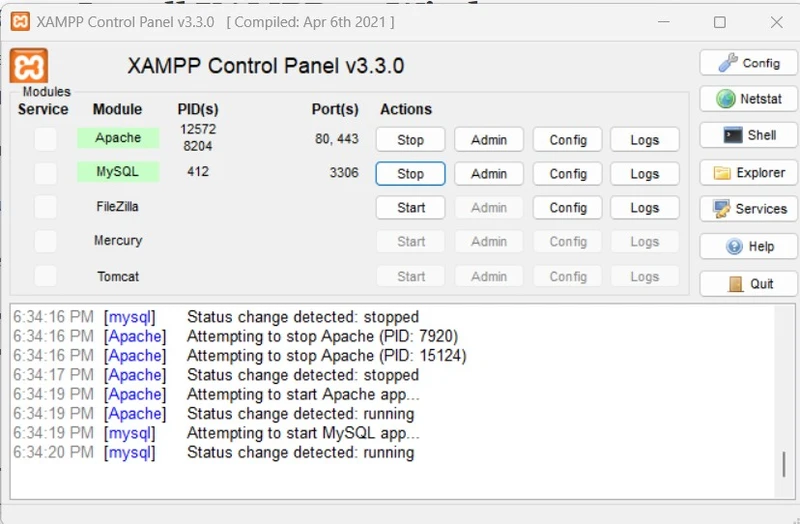
Both services must be running properly, as they are required for the Joomla installation process.
After this step, you can continue with creating a database and running the Joomla setup wizard. If you plan to work with templates later, you may also find this helpful: How to Install Joomla Template on Localhost Using XAMPP.
For users who want a complete pre-configured Joomla setup with demo content, check: How to Install Joomla QuickStart Package.
Note: If Apache does not start, it is usually due to a port conflict. In such cases, check for applications like Skype or IIS that might be using the same port and stop them before restarting Apache.
Step 2: Open phpMyAdmin
After starting the required services in XAMPP, the next step is to access phpMyAdmin, which is used to manage your databases. This is where you will create a database for your Joomla installation.
Open your web browser and enter the following URL:
http://localhost/phpmyadmin
This will open the phpMyAdmin dashboard, where you can create and manage databases easily.
Make sure that both Apache and MySQL services are running in the XAMPP Control Panel before accessing phpMyAdmin.
Note: If phpMyAdmin does not open, check whether the MySQL service is running or verify that you are using the correct localhost URL.

Step 3: Create a Database
To create a database, follow these steps:
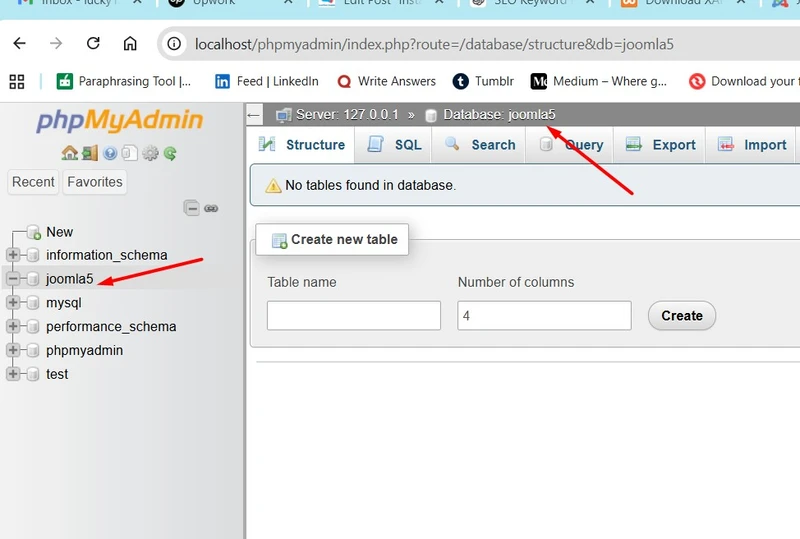
- Click on the New option in the left sidebar
- Enter a database name (for example: joomla5_db)
- Click on the Create button
The database will be created instantly and will appear in the list on the left side.
Important: Make sure to remember the database name, as you will need it later during the Joomla installation process.
Creating a new database in phpMyAdmin for Joomla 5 installation
Step 4: Download Joomla 5
After setting up your database, the next step is to download the latest Joomla 5 installation package. It is always recommended to download Joomla from the official website to ensure you are using a secure and updated version.
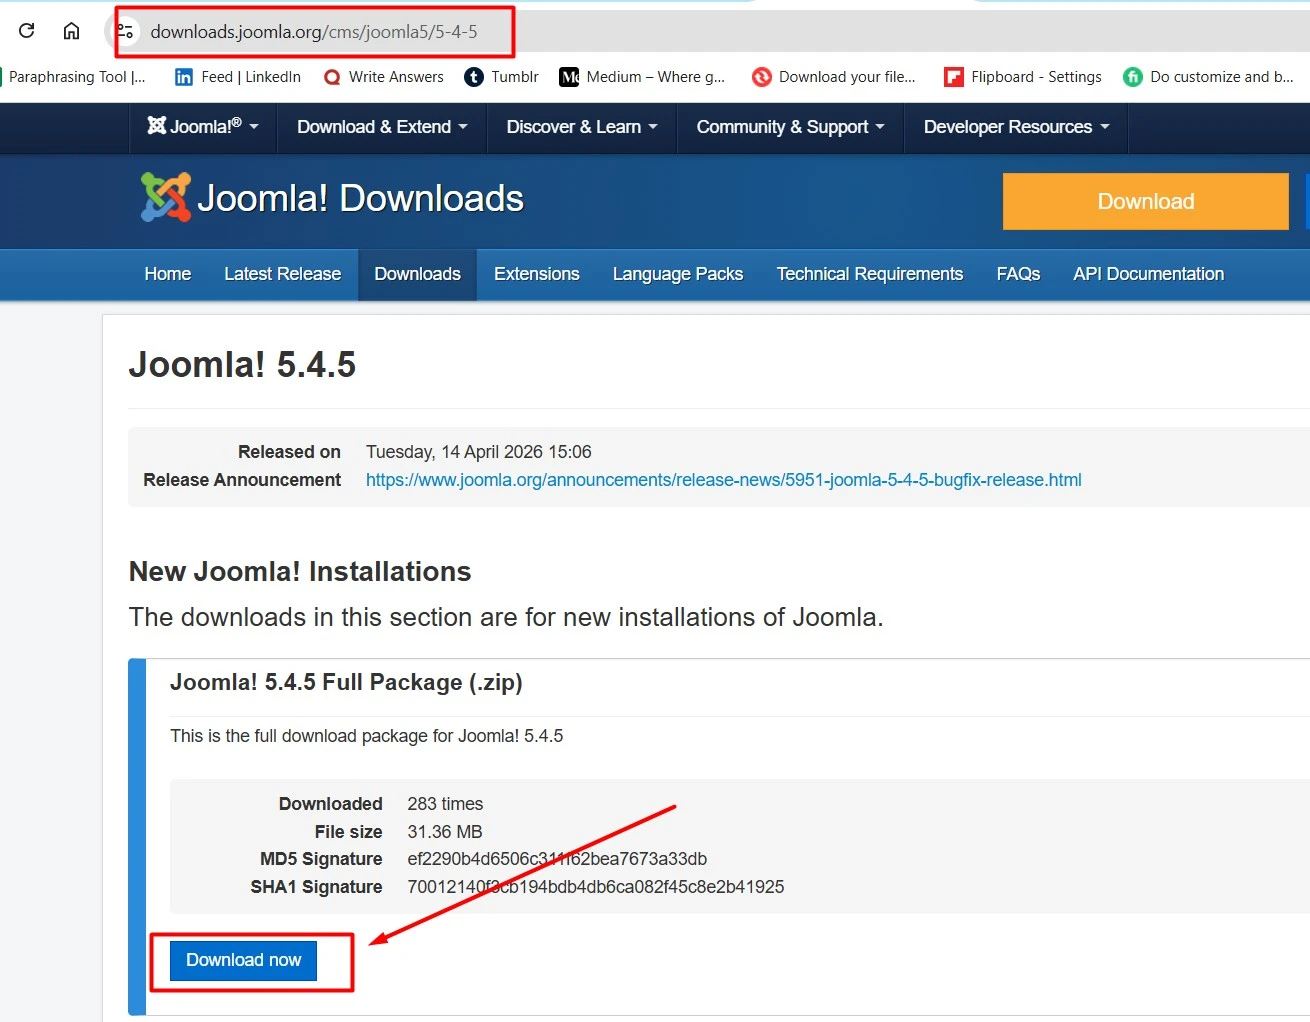
Visit the official Joomla downloads page: Download Joomla 5
Download the latest stable version available in .zip format. Once the download is complete, extract the files to a folder on your system.
These extracted files will be used in the next step to set up Joomla in your local server environment.
Downloading the latest Joomla 5 package from the official website
Step 5: Move Joomla Files to htdocs
Once you have downloaded and extracted the Joomla 5 package, the next step is to place these files into the correct directory of your XAMPP installation. This allows your local server to access and run Joomla properly.
Navigate to the XAMPP installation folder on your system, typically located at:
C:\xampp\htdocs\
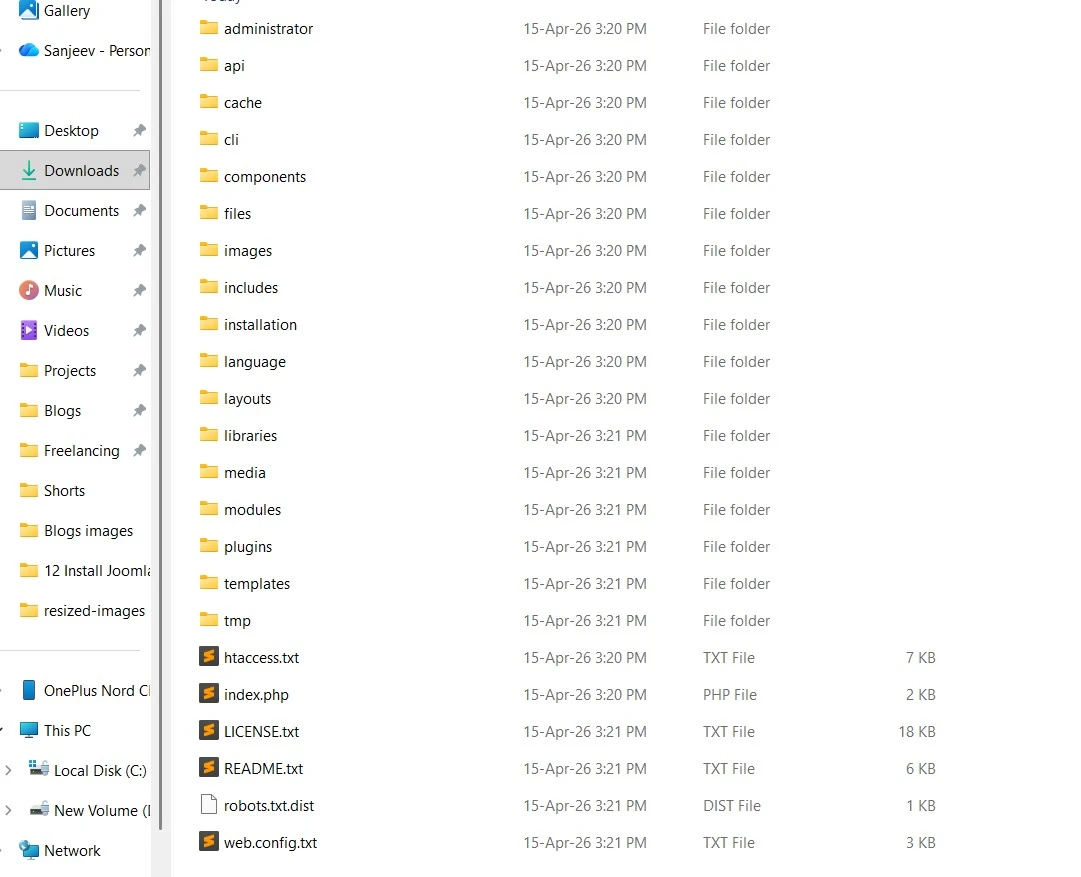
Create a new folder inside the htdocs directory (for example, joomla5). Then copy all the extracted Joomla files and paste them into this folder.
This folder name will act as your local website URL. For example, if you name the folder joomla5, your site will be accessible at:
http://localhost/joomla5
Make sure all files are placed correctly inside the folder before proceeding to the installation step.
Extracting Joomla 5 files and placing them inside the htdocs directory in XAMPP
Step 6: Start Joomla Installation
After placing the Joomla files in the htdocs directory, you are now ready to begin the installation process. This step involves configuring your website, setting up admin credentials, and connecting the database.
Open your web browser and enter the following URL:
http://localhost/joomla5
This will launch the Joomla installation wizard. Follow the on-screen instructions to complete the setup:
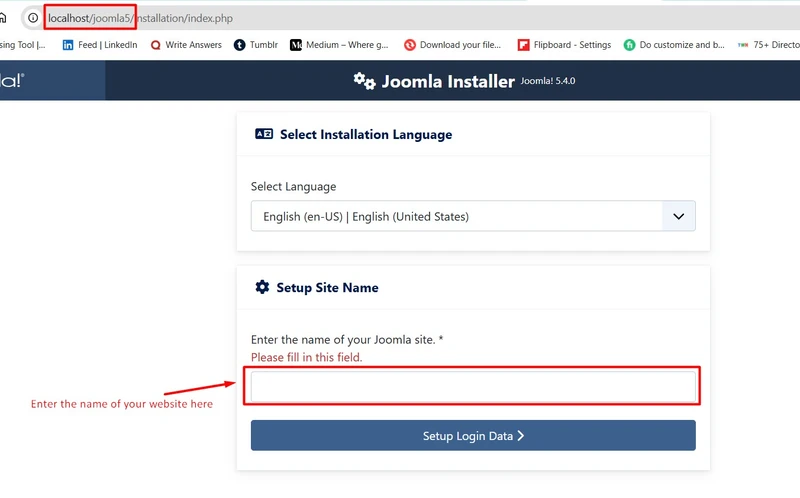
Site Configuration
- Enter your Site Name
- Add a description (optional)
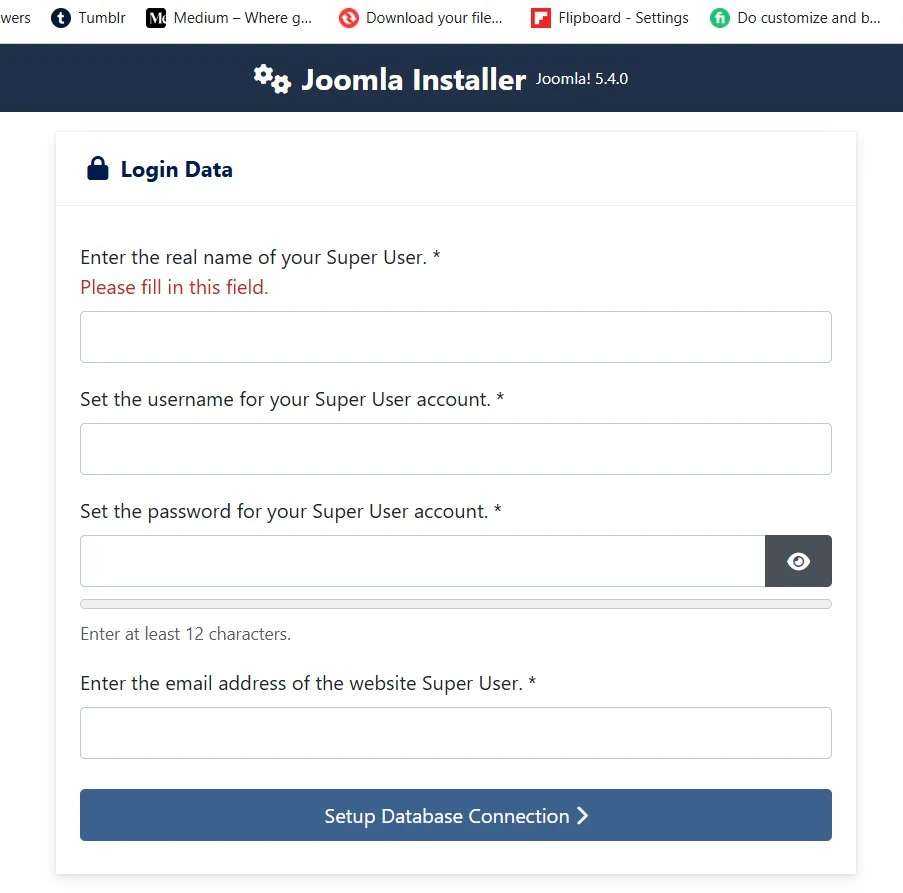
Admin Login Details
- Enter your username
- Set a strong password
- Provide your email address
Database Configuration
- Database Type: MySQLi
- Hostname: localhost
- Username: root
- Password: (leave blank by default)
- Database Name: your created database name
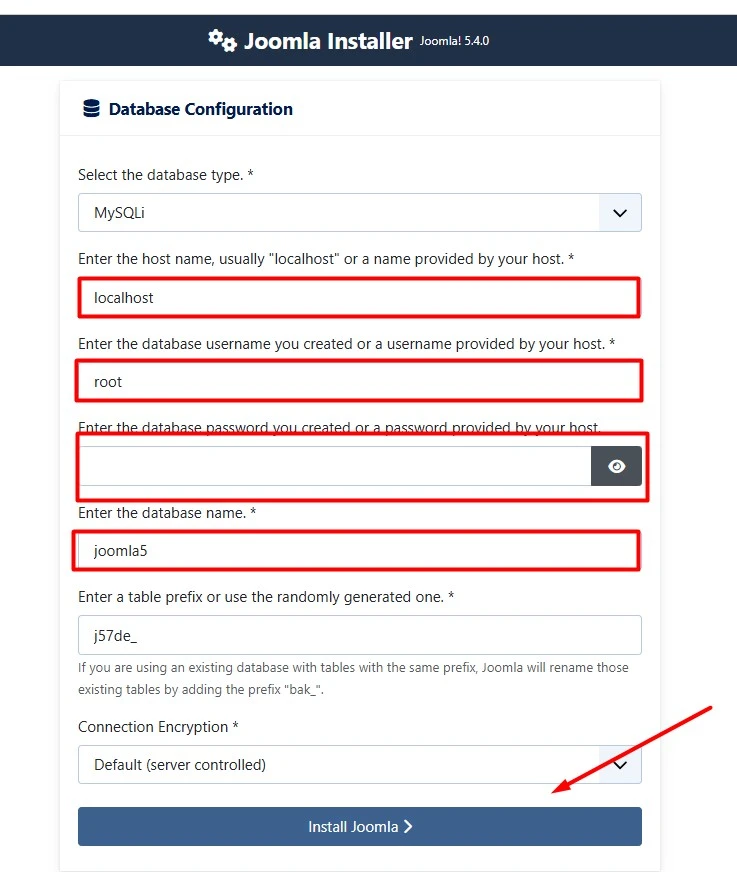
Once all the details are filled in, click on the Install Joomla button to start the installation process.
After the installation is completed, you will see a success message. Make sure to remove the installation folder as prompted.
Step 7: Complete Installation of Joomla
Once the installation process is successfully completed, Joomla will display a confirmation message indicating that your website has been installed correctly. At this stage, your local Joomla environment is fully ready to use.
Before accessing your website, you must complete one important security step: removing the installation folder. This step is essential because it prevents unauthorized users from re-running the installation process on your site. Joomla usually provides an automatic option to remove this folder after setup.
After the installation directory is removed, your website will be accessible through the following URLs:
- Frontend: http://localhost/joomla5
- Administrator Panel: http://localhost/joomla5/administrator
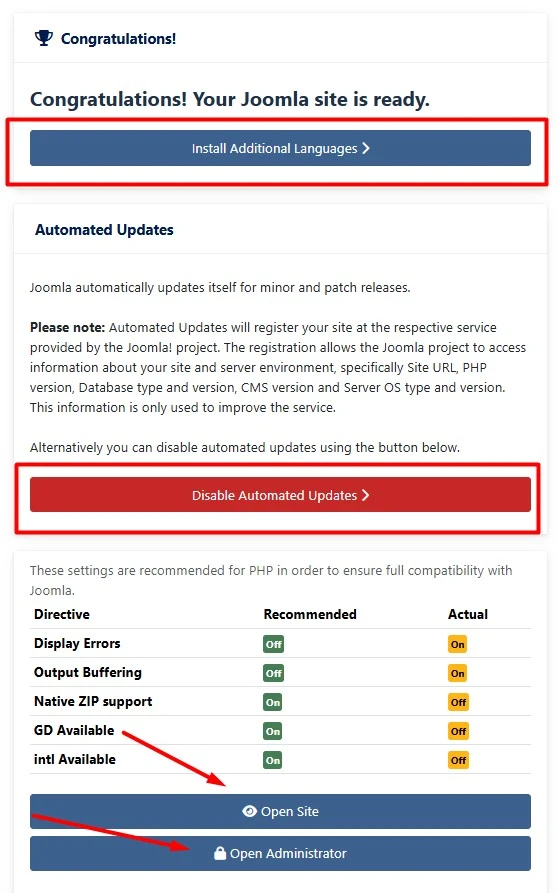
NOTE: If you disable Automated Updates, your Joomla 5 website will not update to the latest version automatically. I recommend disabling it because automatic updates may remove or override customizations you have made.
You can now log in to the administrator panel using the credentials created during installation. From the dashboard, you can start managing content, configuring settings, and customizing your website structure. After installation, you may want to customize your site. Learn how to access Joomla template files.
At this point, Joomla 5 is successfully installed on your Windows 11 system using XAMPP, and you can begin building your website.
Next Steps After Joomla Installation
After completing the installation, the next step is to design your website and choose a professional template that matches your project requirements. A well-structured template plays a key role in improving both user experience and SEO performance.
If you are exploring design options, you can check these helpful resources:
- Best Free Joomla Templates — A complete guide to selecting high-quality free templates.
- 5 Best Free Joomla Templates — Curated list of top-performing templates for modern websites.
To apply a template or quickstart package, you can refer to:
When you are ready to move your website to a live server, follow this guide:
Joomla 5 Installed Successfully on Windows 11
This heading indicates that Joomla 5 has been successfully installed on a Windows 11 system without any errors. It means the installation process is complete, the local server environment is properly configured, and the website is ready to be accessed and managed.
At this stage, you can log in to the Joomla administrator panel, start customizing your website, install templates or extensions, and begin adding content. It is also recommended to keep Joomla updated. Follow this guide: how to update Joomla to the latest version.
Common Issues and Fixes
At this point, Joomla 5 has been successfully installed on your Windows 11 system using XAMPP. The installation process is now complete, and your local website is fully functional and ready to use.
You can access your website from the frontend or log in to the administrator panel to start managing your content. From here, you can install templates, add extensions, customize settings, and begin building your website according to your requirements.
Setting up Joomla on localhost gives you a safe environment to test changes, experiment with features, and develop your site before moving it to a live server.
Install Joomla QuickStart Package on Live Server
If you want to launch your website directly on a live server, you can install a Joomla QuickStart package, which includes Joomla core, template, extensions, and demo content in one package.
Unlike manual setup on localhost, QuickStart installation gives you a ready-made website similar to the demo preview.
Basic Steps:
- Upload the QuickStart ZIP file to your server (public_html)
- Extract all files
- Create a MySQL database
- Open your domain to start the Joomla installer
- Enter the database and admin details
- Select “Install Sample Data” (important)
- Complete the installation and remove the installation folder
Important:
QuickStart works only on a fresh installation and will overwrite any existing website.
For detailed instructions, check: How to Install Joomla QuickStart Package
Apache (XAMPP) Not Starting
If Apache fails to start in the XAMPP Control Panel, it is usually caused by a port conflict. This happens when another application is already using the default ports required by Apache.
To fix this issue, try the following solutions:
- Ensure no other applications (such as Skype or IIS) are using port 80 or 443
- Change the Apache port number from the XAMPP Control Panel (for example, use port 8080)
- Run XAMPP as Administrator and restart the services
After applying these steps, restart Apache from the XAMPP Control Panel and check if the issue is resolved.
For a detailed step-by-step solution, refer to this guide: How to fix Apache not starting on XAMPP
MySQL Not Running
If MySQL does not start, it may be caused by another database service running on the same port.
- Check if another MySQL service is already running
- Stop conflicting services or change the MySQL port
- Restart XAMPP
Database Connection Error
This error usually occurs during Joomla installation when the database details are incorrect.
- Verify the database name you created in phpMyAdmin
- Ensure the username is root (default)
- Leave the password blank unless you have set one
phpMyAdmin Not Opening
If phpMyAdmin does not load in your browser, check the following:
- Make sure MySQL service is running
- Use the correct URL: http://localhost/phpmyadmin
- Clear browser cache or try another browser
Blank Page or White Screen
A blank page after installation is often related to PHP errors or configuration issues.
- Enable error reporting in Joomla configuration
- Ensure you are using a compatible PHP version (PHP 8.1 or higher)
- Check error logs in XAMPP
Installation Stuck or Not Completing
If the installation process gets stuck, it may be due to system limitations or incorrect settings.
- Increase PHP limits (memory_limit, max_execution_time)
- Restart Apache and MySQL
- Clear browser cache and try again
Pro Tips
- Always use the latest Joomla version
- Keep XAMPP updated
- Test locally before going live
- Take regular backups
Frequently Asked Questions (FAQs)
1. Can I install Joomla 5 on Windows 11?
Yes, Joomla 5 works perfectly on Windows 11 using local servers like XAMPP. Make sure your system meets the required PHP and MySQL versions.
2. Which is better for Joomla installation, XAMPP or WAMP?
XAMPP is more beginner-friendly and widely used, making it a better choice for installing Joomla on localhost.
3. What are the requirements to install Joomla 5?
You need PHP 8.1 or higher, MySQL/MariaDB database, and a web server like Apache (included in XAMPP).
4. Why is Joomla not installing on localhost?
This usually happens due to incorrect database configuration, Apache not running, or incompatible PHP versions.
5. What is the default Joomla admin URL after installation?
The default admin panel URL is: http://localhost/yourfolder/administrator
6. Can I install Joomla without XAMPP?
Yes, you can use WAMP, MAMP, or install Joomla directly on a live server, but XAMPP is the easiest option for beginners.
Stay updated with our latest news, special offers, and exclusive updates directly in your inbox.