
The XAMPP installation is a very easy task, but Windows 10 sometimes might not allow the Apache server to run. So let me explain how to fix apache not starting on XAMPP.
Usually, it’s because the World Wide Publishing Service is running on port 80 on your computer, which also happens to be the default TCP/IP port that Apaches uses on XAMPP, and two applications can’t use an equivalent networking port.
If you run into this issue, there are a few ways to get around it. you’ll uninstall the publishing service, otherwise, you can change the default port on Apache.
Uninstall World Wide Web Services
Before uninstalling World Web Services make sure, you don’t have any app depending on the World Wide Web Services feature.
you can uninstall it using the following steps:
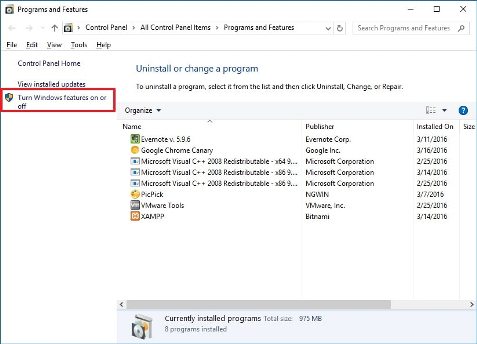
Step1: Type Control Panel in the search bar and open it.
Step2 : Click on Programs = > Programs and Features.
Step3: After that, you can see a new Window where the Left side Turns Windows features on or off option click on it.
Let See: What are the New Features in Joomla 4?
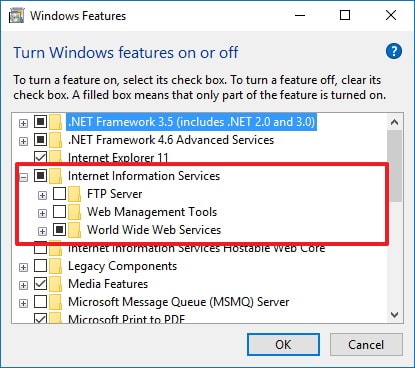
Step4: You can see a new window where an Internet Information Services option with a plus sign(+).
Step5: Click on + sign and you will see the World Wide Web Services option with a checked checkbox so clear it and click on the OK button.
Step 6: Restart your computer.
Step 7: Start XAMPP Control Panel.
Step 8: Start the Apache server by Clicking on Start Button.
Let’s See: Top 10 Free Source Code Editors For Developers
How to Change the default Apache TCP/IP port?
if you have an application that depends on World Wide Web Services and you can remove the WWWS service then you need to change TCP/IP Port. So Apache will run on different Ports.
So follow the below steps to change Apache port-
Step 1: Open XAMPP Control Panel and click the Config button.
Step 2: Select the Apache (httpd.conf) option Scroll down and find the line: Listen 80.
Step 3: Change the number 80 for another IP port number that isn’t in use. For instance, you can try port 81 or any other. (After the change the line should read: Listen 81.)
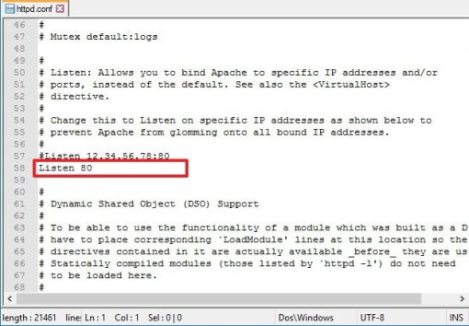
Step 4: Save and Close httpd.conf file.
Step 5: Click the Start button on Apache from the XAMPP Control Panel.
After completing the steps, the Apache server should run without issues on the new port that you specified.
How to install XAMPP on Windows 10? and How to configure it?
How to increase phpMyAdmin upload size on XAMPP?
Another common problem with XAMPP is the default database upload limit. As an example, repeatedly developers will make a replica of an internet site for troubleshooting purposes or work on-site without disrupting the live website. However, people using WordPress or another content management software will quickly determine that they can’t upload a database because it exceeds the maximum upload size permitted, which by default is 2MB.
To increase the database upload limit on phpMyAdmin, use these steps:
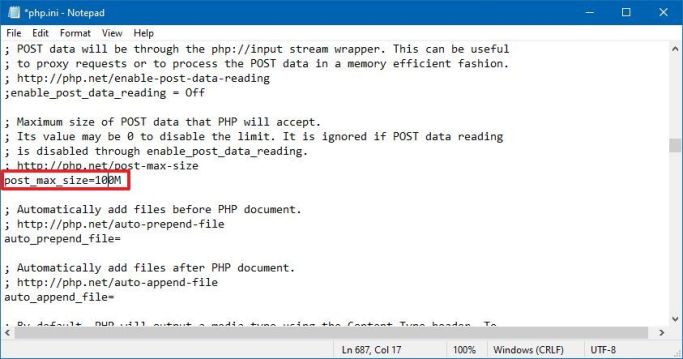
Step1: Open the php.ini file from the path C:\xampp\php/php.ini
Step 2: In this file search 2 variables upload_max_filesize and post_max_size. And replace old values with the required values that you want. for example post_max_size=80M and upload_max_filesize=80M to import database files of up to 40MB.
Step 3: Click on the STOP button and then, click on the START button for MySQL and Apache.
After that you complete the steps, you should now be able to import large database files on phpMyAdmin.
Let’s See: How to install XAMPP on Windows 10? and How to configure it?
How to change phpMyAdmin password on XAMPP
By default, MySQL phpMyAdmin uses “root” as username without password, which means that if you’re installing a Joomla or WordPress site when asked you only need to enter root as the username and leave the password field empty.
To change or create the phpMyAdmin password on XAMPP, use the following steps:
Step 1: After Starting XAMPP Control Panel, Open phpMyAdmin by clicking on the Admin button or directly with the path localhost/phpMyAdmin in the browser.
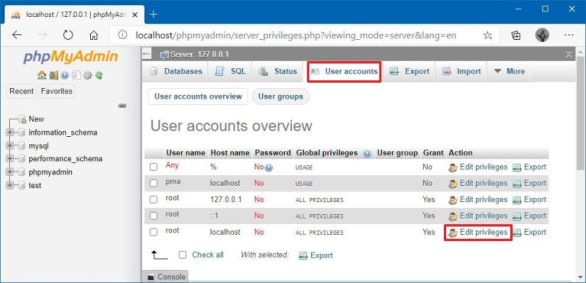
Step 2: Click on the User Accounts tab.
Step 3: Click the Edit privileges link for the username root, where the hostname is localhost.
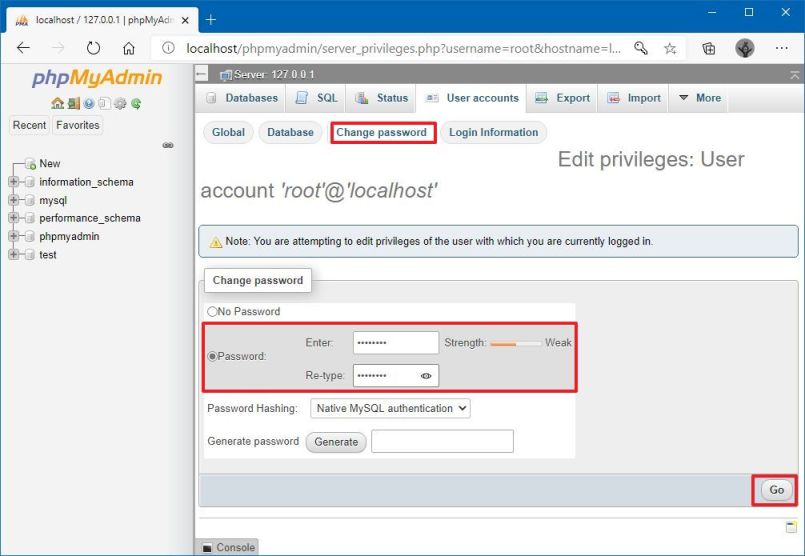
Step 4: Click the tab Change password that is in the center.
Step 5: Enter Password and Confirm Password in the text fields and click on Go Button.
How to fix phpMyAdmin access denied message
Sometimes we have problems signing into phpMyAdmin, we’ll need to configure the config.inc.php.
To change the configuration settings in the config.inc.php file, follow the following steps:
Let’s See: Top 10 Free Source Code Editors For Developers
Step 1: Open XAMPP Control Panel.
Step 2: Click on Explorer Button and phpMyAdmin folder.
Step 3: In this folder, you can see the config.inc.php file. Open with any text editor.
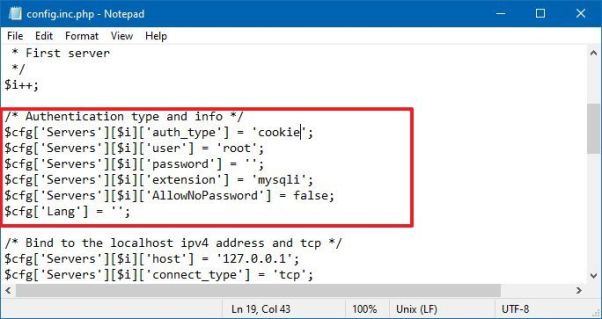
Step4: Search “Authentication type and info,” and under this text update the following lines:
- On
$cfg['Servers'][$i]['auth_type'] = 'config';replaceconfigforcookie. - On
$cfg['Servers'][$i]['AllowNoPassword'] = true;replacetrueforfalse.
Step 5: Save and Close the file.
After completing the above steps you should be able to access to phpMyAdmin dashboard.